First rough filing and sanding of the
initial application of JB Weld Epoxy to fill in the roof cuts. Note, the curved
body line at the roof to door edge will require additional filling and sanding
to make a smooth body line contour. Blow holes will require a second
application of JB Weld Epoxy. The rear window has been filed to a rough opening
contour.
You can see the unchopped Host door sitting
in the unchopped top opening, You can see how much additional height had to be
added to the door to make it conform to the opening. In this picture, front
axle height has been modified to stock height and 1940 Ford wheels and tires
from an ERTL model have been installed. Wheels will roll and front wheel will
steer properly. You can see one of the chopped top bodies in the
background.
The door has been drilled and pinned and a cut
made to obtain the proper door profile.
The pieces of the door needed to
obtain stock roof height. All pieces were drilled, pinned and epoxied in
place.
One expoxied together, a wire reinforcement was JB
Welded in place for added strength.
With door panel filed to fit and the wire strengthening
piece in place, the door is ready for final filling and body work.
One photo shows both doors at stock window height with door panels
modified and installed.
A Ford Motor Company archive photo shows the stock wind shield frame and windshield wiper. Deluxe 34 Ford Three
Window Coupes had two windshield wipers as Roy's model will have, donated from a
37 Ford Road Signatures model. The stock height windshield frame needs to be
hand fabricated. After consultation between Jerry and myself, we decided to use
a piece of "N" scale railroad track rail, which is an alloy brass material that
can be easily bent and soldered. The frame was made out of two pieces of N
gauge train track.
One of the photos shows the two piece construction of the
windshield frame soldered together. After polishing, it will resemble a chrome
plated frame and it fit the opening perfectly.
The molded plastic hood had to be
filled with plastic filler, since it had a hole in it for a blower scoop. It
had to be filled at the bottom also, since headers came though the side of it.
2 mm
plastic molding was used to simulate the center hood hinge. Automotive spot
putty was used to fill in minor imperfections.
Since the ERTL model had a filled roof and Roy's
hot rod had a vinyl roof insert, 1 mm plastic half round material was heated and
carefully bent and glued into place to simulate the roof insert. The molding
will be precision masked and the insert painted flat black, after final paint
has been applied. Note the final contour and smoothness of the roof body line at
the door edge.
Finish primed body, doors and fenders with 40
Ford tires and wheels installed. Rear spare tire mount will be added in the next
phase of the work with motor installed and front and rear bumpers added.
Notizie, commenti, considerazioni e opinioni sul mondo del modellismo e dell'automobilismo, a cura di David Tarallo. ATTENZIONE, NUOVO SITO DAL 28 LUGLIO 2021: www.pitlaneitalia.com
01 febbraio 2014
'34 Ford Hot-Rod affair: parte 2
Ecco qualche dettaglio in più sul lavoro che Joe Rybicki e Jerry Poniatowski stanno portando avanti su un Ford Hot-Rod di Ertl. Una breve presentazione la trovate in un post pubblicato ieri.
________________________________________________________________________________________________
PARTS CARS USED IN MODEL CONSTRUCTION : Note: No stock height topped 34 Ford has been made in 1:18th scale.
Purchased from Ebay, two 1:18th scale ERTL 34 Ford chopped top hot rod bodies with complete interiors. Cost approximately $20 US and one built ERTL 34 three window coupe model with blown big block and dropped front axle for the use of fenders, hood and grille. This model cost about $30 US and was complete in the box. Also, purchased one Sollido 34 Ford Roadster for front and rear bumpers; cost approximately $25 dollars US. Other detail parts in 1:18th scale needed to complete the model such as a battery, master cylinder, jack , etc., purchased from various suppliers found on Ebay. Purchased one complete Chevrolet V-8 engine in 1/18th scale from Arizona Die Cast, with resin cast dual quad four barrel carburetors and two chrome air cleaners; cost about $10 dollars US. Purchased one ERTL 1940 Ford coupe model on Ebay for $30 dollars US for tires and wheels. Purchased one 1937 Ford Cabriolet by Road Signatures for windshield wipers and side mirrors. That model will be used to build a 1937 Ford Slant Back Sedan, which is Jerry's present street rod.
_________________________________________________________________________________This is a photograph from the Henry Ford Museum archives of a stock 34 Ford three window coupe that was scaled to obtain the proper top height and top profile.
In this photo, the chopped top ERTL model sitting on 34 Ford fenders and the mag wheels that came from the blown ERTL hot rod model. Note, the blown model's frame was used and it had a dropped front. Since Roy's car was stock height, ride height had to be modified on the axle with a spacer to stock height. Also, the blown model had a plastic hood with blower protruding out the top of it and headers coming out the sides of the hood. The hood was modified and used for this build (see later photo).

These are the two donor model bodies. One has already been stripped of its light blue paint, using chemical stripper.

Both bodies have had their paint removed and have started to be marked with felt pen as to where cuts would have to be made to obtain a stock top height. Note the bodies are marked "Host" and "Donor" to avoid confusion as to where the different roof parts need to go.

The bodies were clamped to a work table and the appropriate cuts made with a hand saw and powered Dremel Tool.
Sixth Picture : This picture shows felt pen markings on both bodies of cuts needed to obtain enough material out of one, the one on the Donor roof on the left to be added to the Host body on the right hand side of this photo.
With one top removed, pie shaped cuts were made to begin to obtain the proper top profile. These are the same techniques that would be used on a real car to unchop a top. This is the most difficult part of the unchopping process. An error here would ruin the body being used or would require much more body filler to correct. The corner of the top was bent backward to the right profile.
Note how the thickness of the die cast body varies, depending on location. This makes the cutting effort more difficult.
One of the pictures shows the slit cut in the top necessary to obtain the correct profile.
A partial horizontal cut was made, after the vertical slit cut and the die cast metal very carefully bent backward to the desired profile of the back of the roof. A pin has been drilled and installed in the rear roof portion.
In the corner of the front windshield pillar, a partial, very shallow cut was made and the pillar heated with a hair dryer to carefully bend the pillar backward. The pillar will then be drilled and a brass pin epoxied into it for the top to be pinned to the cowl at final assembly.
The front windshield pillar has been drilled and a brass pin epoxied in place for structural rigidity and to make a good bond to the top.
Fortunately, the rear portion of the body metal was thick enough to drill and install a pin. This was done on both sides of the top.
Carefully placing the Donor roof onto the cuts in the Host body, you can see the puzzle of cuts necessary to obtain the correct top profile and height. The Donor roof is pinned and epoxied in place in this picture. The next step in the process is to mix JB Weld and fill in the cuts to eventually obtain a smooth body. Any voids or holes will require another application of JB Weld epoxy. It can be filed and sanded and accepts automotive type lacquer primer surfacer.
A rear roof photo shows the filling and filing that will be necessary to obtain the required rear window opening.
One picture shows the application of JB Weld and the cuts made in the door frame to obtain the proper height to match the now unchopped top. Looking closely, you can see that the door has been drilled and pinned for structural rigidity, since the hinged opening door will be the most delicate part of the model. Additional photos will show door reinforcing details.
Rassegna stampa: Four Small Wheels 10/2013
Colpevole ritardo nella recensione! Proprio mentre il primo numero del 2014 di FSW è in fase di spedizione agli abbonati di tutto il mondo, cerco di recuperare il tempo perduto parlando dell'ultimo fascicolo del 2013. Non so a voi, ma per me FSW resta la rivista più interessante. Old style quanto basta, tutta sostanza e con un'onestà intellettuale apprezzabile per quello che comunque è un bollettino di un negozio. Ma quelli di GPM, prima Brian Harvey, poi André Marot, Mark Chitty e compagnia, sono quasi sempre riusciti a mantenere separata l'esigenza di recensire un modello con le sacrosante esigenze commerciali della loro attività principale.
Le editor's choices di pagine 3 consigliano il kit MFH in scala 1:12 della McLaren M4/4 F.1 del 1988 (versioni GP Monaco o Detroit). Dalle poche linee di commento e dalle quattro foto accluse si capisce che deve trattarsi di qualcosa di notevole. Per l'1:24 la palma di modello del mese va alla Skoda Fabia S2000 Evo IRC 2012 di Belkits, mentre l'1:43 vede la new entry dell'ennesimo marchio di resincast cinese, Century Dragon (giustamente...), che esce con una Jaguar C-X75 la cui finitura ricorda la premiata ditta Spark e tutti i suoi accoliti. Non poteva mancare fra le novità librarie l'annuario 2013 della 24 Ore di Le Mans, a cura dell'ormai leggendaria triade Teissedre, Moity e Bienvenu. Tante le novità recensite nella parte principale della rivista (en passant viene da notare come Renaissance abbia trovato un valido modus vivendi nella produzione e vendita di decals, transkit e accessori vari, anche e soprattutto nelle scale più grandi come l'1:24).
Nella pagina delle recensioni, direi che la novità principale (e comunque novità non è visto che era uscito diverso tempo prima) è il volume 5 della serie Joe Honda Sportscar, dedicato alla Ferrari 512S nella stagione 1970. Stagione non completa, visto che questo quaderno occupa 7 gare su 10 del Mondiale Marche, ossia Daytona, Monza, Brands Hatch, Targa Florio, Le Mans, Spa e Watkins Glen. Chiude come al solito la rivista, il pezzo storico di David Blumlein, che ispirandosi al modello Minichamps, traccia la storia sportiva della Delahaye 145 (foto sotto).
Co.Met Milano: gallery di mezzi industriali
A completamento della presentazione di Co.Met. Milano, ecco una gallery di foto di modelli montati. E' un livello di rifinitura volutamente di "base", che consente ai più esigenti di completare le miniature come meglio credono e allo stesso tempo permette di tenere basso il prezzo vendita. Le prime due immagini sono relative a kit modulari. Gli altri modelli sono degli speciali venduti solo completi.
Co-Met Milano: un modo molto italiano di fare 1:87
L'interesse suscitato da alcuni articoli su "nonomologati" e la sua particolarissima produzione di mezzi industriali in scala 1:87 mi ha portato ad approfondire l'argomento, risalendo alle origini dei kit che Marco di "nonomologati" utilizza per le proprie bellissime realizzazioni. Il nome Co.Met.Milano sarà noto agli appassionati del settore, ma forse non lo è altrettanto a chi non si occupa in maniera abbastanza specifica del tema (oltretutto Co.Met. non produce solo mezzi industriali, ma anche una bella campionatura di auto italiane degli anni settanta/ottanta, come la Lancia Fulvia, la Delta Integrale, la Giulietta o l'Alfa 75). Ecco perché ho ritenuto opportuno presentare questo nome, tipica espressione di un certo artigianato italiano, e lo faccio direttamente attraverso le parole dell'interessato, che ringrazio per la collaborazione e la gentilezza con la quale mi ha fornito le foto e le relative spiegazioni. Spero che in un prossimo futuro si possa tornare anche in modo più approfondito sull'interessantissima produzione di Co.Met.Milano. Chi desiderasse contattare Ferdinando, può inviare una mail a comet.milano@libero.it oppure chiamare il 348 060 8535.
Buon giorno
a tutti,
Mi chiamo Ferdinando e sono il titolare
della Co.Met.Milano. Mi sono dedicato anche a questa attività sin dal
2001.
Appassionato di fermodellismo e di tutto ciò che è grande
meccanica, rimanevo incantato fin da bambino per ore e ore a guardare dal
balcone di casa i camion che passavano, per lo più carichi di lamiere o billette di acciaio, piuttosto che di rottami.
Ovviamente tutto ciò veniva trasferito nei miei giochi!
Diventato un “bambino”
grande, man mano che i miei giochi si tramutavano in vero e proprio
collezionismo, notavo la persistenza di una lacuna nel panorama degli automezzi
“pesanti” italiani nella scala H0
(1:87).
Ho deciso pertanto di
riprodurre personalmente quei mezzi che noi collezionisti italiani e
“italianisti” desideravamo.
Mettendo a punto il mio progetto, sono giunto alla
conclusione di voler creare modellini dalle grandi potenzialità ma che fossero
al tempo stesso semplici e veloci da assemblare anche per i meno esperti. Un
modello per tanti.
Ho così sviluppato dei kit versatili in grado di
soddisfare opportunamente le esigenze di ognuno di noi, lasciando ampia
possibilità di completare e personalizzare il proprio modello.
Esempio più eclatante di questa mia filosofia costruttiva
sono le elaborazioni dell’amico Marco, che con la sua nuova linea di modelli Co.Met.nonomologati, è riuscito ad esprimerla ed esaltarla
al meglio.
Indispensabile
ed irrinunciabile caratteristica di ogni mio prototipo è il rispetto più puro
della realtà, la rispondenza di geometrie e proporzioni verso quei veicoli che
al vero sono stati parte della nostra storia e cultura.
Per fare tutto ciò è stato
necessario attrezzarsi anche di nuove tecnologie, tra cui la
modellazione 3D, in modo da poter
sviluppare al meglio ogni singolo progetto, completamente realizzato
da zero e curato in ogni singolo particolare dal sottoscritto. Inutile dire che per proseguire nel mio intento non
è possibile ricorrere a basi commerciali già esistenti.
![]() |
Nelle
immagini ci sono alcune delle fasi di modellazione 3D del Fiat 691, realizzato completamente ex-novo.
|
LA MISSION
Fare rivivere il passato e
la storia di questi fantastici bisonti risvegliandone il ricordo. Tramandarne
la memoria condividendola con tutti gli appassionati di questo fantastico mondo!
Alcuni echi della passione per gli hot-rod: John Rybicki e una Ford 34 di ERTL
| Ford Deuce Hot-Rod di Monogram, scala 1:24 |
Avere a che fare con un'abbastanza ampia collezione di vecchi kit montati in plastica (per lo più americani) mi ha inevitabilmente portato a contatto con realtà che di solito non frequento. E questo non è stato certo un male. Troppo spesso si tende a chiudersi dentro la propria nicchia, che spesso è a sua volta una nicchia della nicchia, finendo per perdere di vista il senso generale di quello che alla fine dovrebbe restare un hobby. In questo senso, alcuni personaggi che ho avuto la fortuna di conoscere, come il nostro Alberto Sarti di Prato, interpretano al meglio un certo eclettismo di interessi (e di conseguenza, di tecniche) che sovente va perduto annegando magari in troppe discussioni sterili. All'opposto sta la concretezza di fondo di molti di coloro che si occupano di questi vecchi kit in plastica. Negli Stati Uniti sono ancora a migliaia, testimonianza ancora molto vitale di un'attività che per almeno un paio di decenni ha costituito le fondamenta dell'automodellismo, non solo laggiù ma anche qui da noi.
Ecco una storia, raccontatami fra ieri e oggi da un collezionista che proprio di recente aveva acquistato un paio di questi modelli; non so come, ma il discorso è caduto sugli Hot-rod, forse ispirato da un altro modello messo di recente in vendita, una Ford Deuce di Monogram. Un pezzo piuttosto ben fatto, praticamente integro, realizzato secondo una delle molte opzioni che kit di questo genere permettevano di ottenere (nota a latere, nel pieno della mania "custom" non erano rare le scatole di montaggio che offrivano la possibilità di montarsi la vettura sia in configurazione normale, sia in versione modificata, con una particolare predilezione per le Hot-rod derivate da modelli anni '30-40).
Ecco il contributo di John Rybicki (Colorado), in pieno tema Hot-rod. Spero che il discorso possa essere approfondito presto, con altre foto e altre notizie.
Intanto buona lettura.
BACKGROUND :
My best friend Jerry Poniatowski and I met in 1957. He is like a brother to me. We went to the same junior high and high school together and have been involved in the same automotive pursuits for over 50 years. In high school, he drove a 1947 Ford Coupe and I drove a 1940 Chevrolet Coupe. We have always been into hot rodding and restoration of classic cars and Corvettes. Both of us graduated from the University of Michigan in Ann Arbor, Michigan. Jerry, who is now retired was a high school Spanish teacher. I am still working. I'm a mechanical engineer. I work for a company called United Launch Alliance, a company formed from Lockheed Martin Space Systems and Boeing Space Systems. We design, build and launch Atlas V and Delta IV rockets, putting into orbit commercial and classified payloads for commercial customers, NASA and the National Reconnaissance Office. I am a propulsion consultant, working cryogenic rocket engines for classified missions. The company is located here in Centennial, Colorado, but all manufacturing is done in Decatur, Alabama. If you Google United Launch Alliance, you can get information on the company.
Regardless of our different career pursuits, we have always had an automotive passion, having grown up together in Detroit. As an engineering intern, I worked at the General Motors Technical Center in the Fisher Body design studio and Chevrolet Engineering. As a student, I designed the first car seat for kids, called the "Child-Infant Restraint System," a fancy word for a car seat. I have worked in an engineering capacity for Chrysler, GM and Ford Motor companies.
Jerry's current street rod is a 1937 Ford Slant Back Sedan, running a small block Chevy and drive trains. He did all of the construction work on it himself, engine installation, paint and upholstery. He is the most talented person I've ever known. He scratch builds American Flyer train engines and rolling stock that were never made before, including all of the electronics, motors and lighting and has won numerous national awards. American Flyer electric trains are called "S" gauge and are Hot Wheels Scale, or 1/64th scale. I was and still am into Lionel trains, which are 1/43rd scale. Both Jerry and I have extensive toy train collections and are involved in the major toy train clubs in the United States, but our main passion is cars.
We started to build models in 1957. Originally, we were into custom car models, but shortly branched into building hot rod models in 1/24th scale. We pioneered hinged opening doors, hoods and trunks, working steering and sprung suspensions and working head lights using grain of wheat light bulbs, long before any company provided such features. Back in the day, we won every major national model car competition sponsored by Revell and AMT. From pictures I took at the Detroit Autorama in 1958, Jerry scratch built Ed Roth's Beatnik Bandit, two years before AMT came out with the model. Most of Jerry's models from back in the day, survive to this day. I scratch built Bill Cushenberry's custom 1940 Ford Coupe, called the El Matador. If you Google these cars, you will see what they look like, if you are not familiar with them.
My friend Roy grew up in the Chicago area. He was a manufacturers representative for company I was doing some engineering development work with. His father had a Jaguar XK-140 that was powered by a 1953 Cadillac V-8. It was called a Jag-I-Lac. Roy raced it at Meadowdale Speedway against Augie Pabst who drove a Corvette powered SCARAB, built by Lance Reventlow. Two years ago, I built that model for him in 1/18th scale, using a number of donor cars.
I had been thinking of building Roy's high school car, a 1934 Ford three window coupe that was powered by a 1957 Corvette motor and dual four barrel carburetors. Jerry and I collaborated on it and he agreed we should build it, since no model company has built an unchopped top 34 three window coupe. Jerry works part time at the Henry Ford Museum, Greenfield Village in Dearborn, Michigan. He has access for archival photographs, so that's where we obtained pictures that we scaled down for the correct height of the stock 34 Ford three window top. I will send you a digital of the picture we used for dimensions and proper contouring of the roof.
I purchased a number of ERTL 34 Ford hot rod bodies on Ebay to be used as donor parts cars. I also bought a full fendered ERTL 34 Ford hot rod model for the fenders, since Roy's car appeared to be completely stock on the outside, but was Corvette powered. His Ford had a number of different engines in it and tire/wheel combinations. He wanted it built in its final configuration. Roy has always been a "car guy". Presently, he has a 40 Ford Coupe street rod and is building a 1951 Ford pickup on a Ford Explorer 4 wheel drive frame.
Jerry completed all of the metal work and primed the model and hand carried it to me from his home in Wayne, Michigan last weekend. My job is to do all the finish detailing, build the engine and do the final painting in gloss black lacquer. I hope to get started on that phase of the project in the next few days, but work travel always takes too much time away from my hobby interests.
I have restored classic cars and Corvettes. At one time I had a collection of about 17 cars. At this time in storage in Illinois, where my wife and I formerly lived; in my olde car shop are : a 62 Corvette, 327/340 horse restored car, a 41 Buick Sedanette with 37,000 original miles on it, two Model T Fords, a 1920 coupe and 1923 four door sedan, a 100 point restoration of a 1928 REO Flying Cloud rumble seat coupe (REO stands for Ransom Eli Olds) who was Oldsmobile before he left GM and started his own company, a 1957 Chevrolet and a 1937 Ford four door sedan, both of which need to be restored.
Here are some pictures describing the process to unchop a top. As I mentioned, we are trying to duplicate my friends high school 1934 Ford hot rod from archival photographs taken in 1956. We started with two ERTL 34 Ford three window coupe bodies with chopped tops. Two models were needed. No one has ever made an unchopped 34 Ford three window coupe in 1:18th scale. The models sold have all been chopped.
Using pie cuts and other metal bending techniques and two tops, we obtained the correct top height and profile and then filled the cuts in with JB Weld, an epoxy filler. To get unchopped doors, the donor model's doors were cut and pinned and a copper wire used to outline the door's window, epoxied in place for structural rigidity. You can see the rough filing marks that were later filled in with automotive primer surfacer, a very thick lacquer primer.
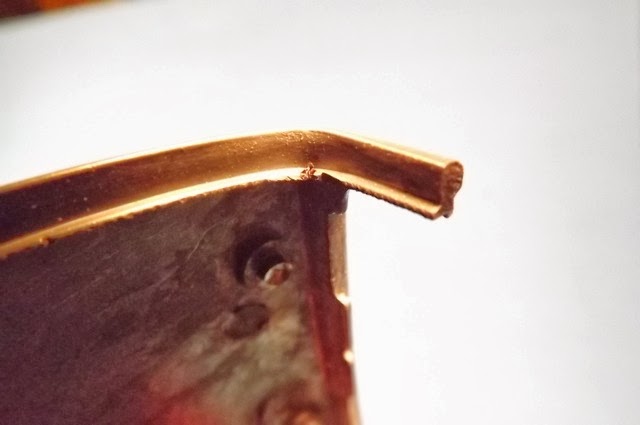
A new unchopped windshield frame was made by bending and soldering and polishing two pieces of brass "N" Gauge model train track. The finished in primer model is shown in the next picture with grille installed, but no windshield frame. All of the body work is flawless. Archive photos of a 34 Ford from the Henry Ford Museum, Greenfield Village was scaled to get the right proportions and top contour. The separate deck lid that maybe ERTL thought to use as a rumble seat was rotated 180 degrees and made to open as a trunk. The tires and wheels are from ERTL's 1940 Ford 1:18th scale model car, since those were the tires and wheels Roy had on his car in its final configuration.
The early hot rod ran a small block Chevrolet engine with two four barrel carburetors, which I have built and wired for detail. It will be installed shortly. The hot rod was virtually a stock looking 34 Ford on the outside, so all the door handles and other trim will be installed, along with bumpers. The donor model had a dropped front axle. We had to raise the front wheels to stock height.
In this last picture, 2 mm plastic stock was heated and bent for the frame outline of the fabric top insert. It will be precision masked and painted flat black after I paint the model in a gloss black color.
Iscriviti a:
Post (Atom)


